There are three major types of wood fillers I use. Each has a unique use, from flat surfaces to vertical carvings. Some have shrinkage and some don’t.
Car Bondo
Car bondo: Pros, super easy to use you cannot mix up this ratio the more red you add the faster the dry time. This stuff is rock hard and sand-able. 
Here is a touch-up done with car bondo.
Epoxy Putty Stick
Tootie Roll: Yup, I know its not called that but honestly I have called it that for years and years and when I talk to other professionals in the field they look at me like I am nuts. 
Cons, this stuff I had a bad run with for a while back in 2010-ish everyone I got was crusting up on the edges. There is a super thin barrier between the outside part and the inside part and if it gets crushed or that barrier wears down it will start to cure making these little hard spots which made my work look like poop. Well, I was told for a long life on these suckers store in a fridge. One of the warehouses I work in is so cold its like working in a fridge and I’ve never had troubles with it there. So maybe that is the key! But beware this stuff smells like a perm straight out of the salon, I used this stuff forgot to wash my hands stopped at a store and the cashier looks at me and says it smells like a perm….. oh nope thats just my dirty hands! So hey wash your hands too!

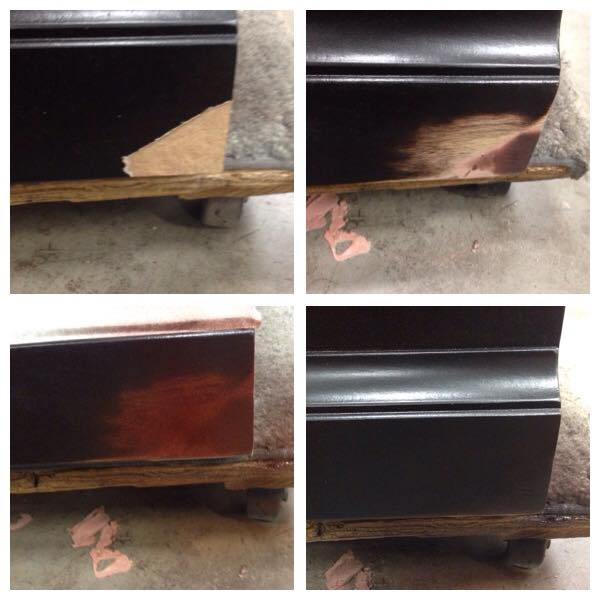
This was filled using toosite roll but also wood burn-in sticks
All Purpose Wood Filler
Standard wood filler: I always have this stuff on hand, for small things like a nail hole fill, small dent that I am painting over and its on the bottom corner. 

This is what I do with this wood filler.
Other Tools you may need for your wood filling: Pan Scrapers work wonders on leveling out fillers. Also once fillers are dry rasps with different grits work great too! Then of course to clean off all the bits of dust we recommend these dusting cloths. Also our recycle tip is keep cardboard boxes cut them up and use for mixing your car bondo.
Happy Filling,
Tara Lou
* This blog contains affiliate links. Please visit my disclaimer page for more information.


Leave a Reply